VMware Quiescing Error (code 1930)
Situation
A VMware backup plan terminates with the following warning: VMware Quiescing Error. Cannot create application-consistent snapshot(s) for one or more VMs with the list of virtual machines with failed application-consistent backups.
Application-consistent snapshot is a stage of so-called application-consistent backup.
Application-consistent backups are used to back up entities with high or extremely high transaction loads. Good examples of such entities can be Microsoft SharePoint, Active Directory, MS SQL Server, Oracle database solutions, or any other.
When such high-transactional solutions are subject to backup, the key point is the memory state and current transactions are stopped, flushed to disk, and are included in the backup dataset.
In cases memory cannot be flushed to disk for some reason, a backup dataset may not be valid for restore or some important data may be missing.
Thus, an application-consistent backup is a backup that is equipped with tools to notify applications about coming backup operation and allow applications to achieve a quiescent and consistent state by flushing all operations to disk
In this case, since the application-consistent snapshot could not be created, the backup agent will request a standard (non application-consistent) snapshot to be created that will be uploaded to the storage instead.
Cause
This warning can occur for several reasons:
- VMware Tools on guest VM are not installed
- VMware Tools do not function properly for some reason
- VMware Tool cannot create a snapshot
Troubleshooting
To begin troubleshooting, it must first be determined if the Virtual Machine(s) in question are able to create a quiesced snapshot outside of our Backup Agent:
- Try creating a quiesced snapshot for the Virtual Machine(s) via the vSphere web client:
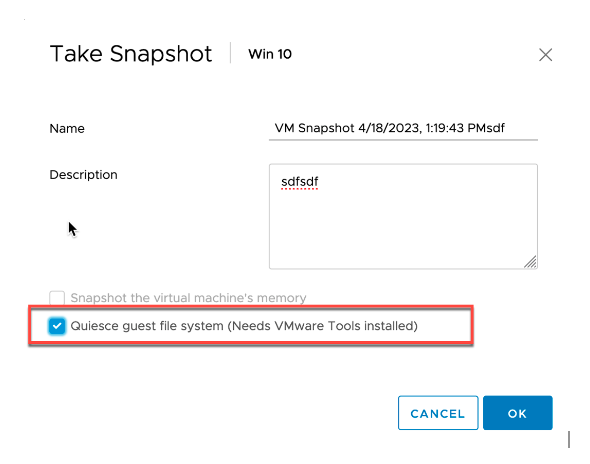
- Once the snapshot has been created, you can verify if it is quiesced by connecting to your ESXi host via SSH and running the following commands:
- Run vim-cmd vmsvc/getallvms - to identify the target Virtual Machine ID (%Vmid%).
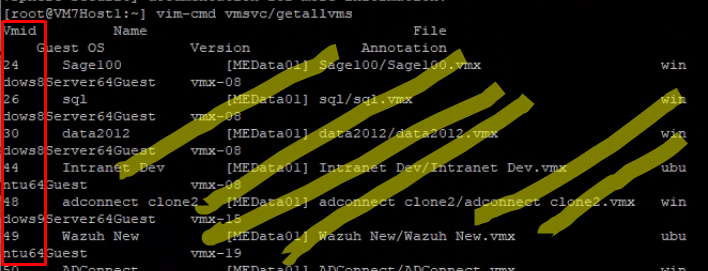
- Run vim-cmd vmsvc/get.snapshotinfo %vmid% - to retrieve the snapshot state.

- A 'false' status for the 'quiesced' flag indicates the snapshot is not quiesced, which will result in a failed application-consistent backup.
Solution
If the Virtual Machine(s) are not able to create the quiesced snapshot outside of our backup agent and the result of the above steps are false, the investigation on why they are not quiesced needs to be continued in your VMware environment by the responsible administrator on your side. There are no changes on our side that can result in the Virtual Machine(s) being able to create the quiesced snapshot.
If this issue cannot be fixed on VMWare side or if it requires some time, in order to allow the plan to run successfully and not finish with the warning, you can disable the application consistent backup option in the backup plan configuration:
- Browse to the Computers page in your Management Console and select the machine where the backups are being performed.
- Choose to Edit the Backup Plan
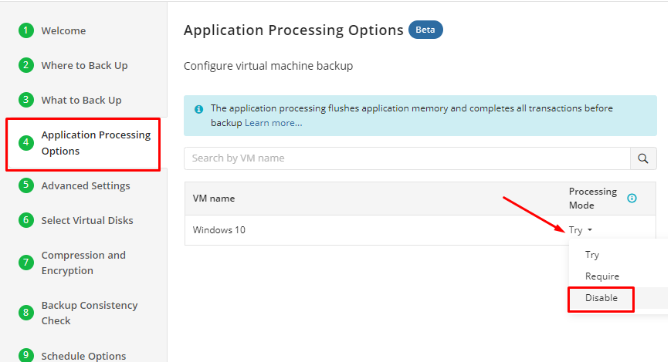
- Browse to the “Application Processing Options” step and choose “Disable” in the “Processing Mode” section for the affected Virtual Machine(s)
If the Virtual Machine(s) are able to create the quiesced snapshot outside of our backup agent and the result of the above steps are true, please make sure you are using the latest version of the backup agent, set the Logging Level to “High”, and recreate the issue by running the backup plan once again.
Then create a Support Ticket with us from the Support Portal, send us the Diagnostic Logs from the machine with reference to the case you just created, and send us screenshots showing you are able to create the quiesced snapshot outside of our backup agent.
Possible Steps in VMware Environment
If the Virtual Machine(s) cannot create the application consistent snapshot, you can consider these steps for the investigation in your VMware environment:
Install or Update VMware Tools
Applies to all supported Windows guest operating systems
Install or update VMware Tools to the latest version.
For Windows 2000 and later, VMware Tools installs a virtual machine upgrade helper tool. This tool restores the network configuration if you upgrade from virtual hardware version 4 to version 7 or later.
Install VMware Tools
Prerequisites:
- Power on the virtual machine
- Verify that the guest operating system is running
- Determine if you have the latest version of VMware Tools by viewing the status of the virtual machine
- User must have administrative privileges
- Mount the VMware Tools virtual disc on the guest operating system by selecting the virtual machine:
- In vSphere Client – Hosts and Clusters view -> right-click the Virtual Machine -> Guest OS > Install VMware Tools
- In vSphere Web Client – Click All Actions -> Configuration -> Install/Upgrade VMware Tools
- In vSphere Host Client - Click Actions -> Guest OS from the drop-down menu, and select Install VMware Tools
- Depending on Guest OS settings the installer may start automatically:
- If autorun is enabled for the CD-ROM drive in the guest operating system, the VMware Tools installation wizard appears
- If autorun is not enabled, launch the wizard manually:
- Click Start > Run
- Type D:\setup.exe where D: is your first virtual CD-ROM drive
- Click OK
- Follow the on-screen instructions. To install non-default components, select the Custom setup.
- If the New Hardware wizard appears, go through the wizard and accept the defaults.
- When prompted, reboot the virtual machine.
Update VMware Tools
- Mount the VMware Tools virtual disc on the guest operating system by selecting the virtual machine:
- In vSphere Client – Hosts and Clusters view -> right-click the Virtual Machine > Guest OS > Install VMware Tools
- In vSphere Web Client – Click All Actions -> Configuration -> Install/Upgrade VMware Tools
- In vSphere Host Client - Click Actions -> Guest OS from the drop-down menu, and select Install VMware Tools
- If you are using vCenter Server and are performing an upgrade or reinstallation:
- In the Install/Upgrade VMware Tools dialog, select Interactive Tools Installation or Interactive Tools Upgrade, then click OK
- The process starts by mounting the VMware Tools virtual disc on the guest operating system. Depending on Guest OS settings the installer may start automatically:
- If autorun is enabled for the CD-ROM drive in the guest operating system, the VMware Tools installation wizard appears.
- If autorun is not enabled, launch the wizard manually:
- Click Start-> Run
- Type D:\setup.exe where D: is your first virtual CD-ROM drive
- Click OK
- Follow the on-screen instructions.
- When prompted, reboot the virtual machine.