How To Access EFS-encrypted Files On Other Locations
Situation
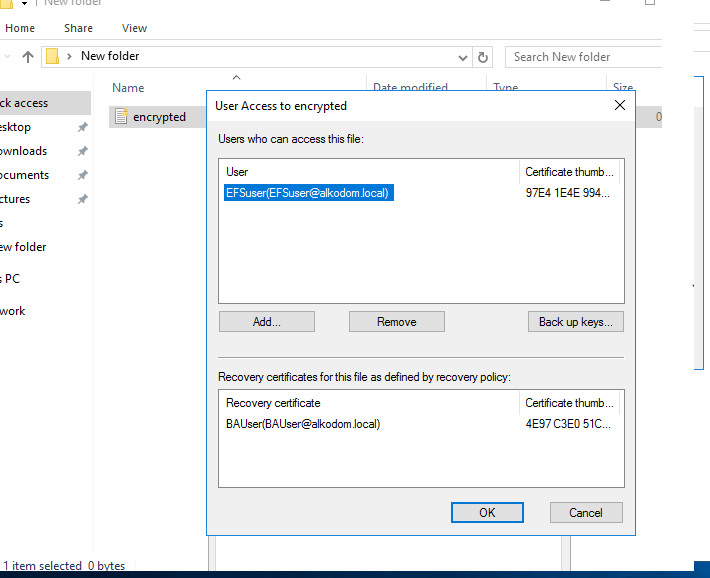
The backup plan contains EFS-encrypted files and the Keep EFS encryption option is selected.
This means that EFS-encrypted files are backed up and kept on backup storage encrypted. The main purpose of any backup is a guaranteed possibility to restore data in case of need: hardware failure or whatever else. In most cases the restore does not require any special actions, but the situation with EFS-encrypted files backed up 'as is' is a bit different: it is tightly bound with the EFS-encryption specification that covers the decryption with the security layer.
Thus, if you keep your EFS-encrypted files backed up 'as is' (encrypted), make some preparations to protect yourself from unpleasant moments that may occur when trying to read restored EFS-encrypted files on a location other than the original computer (the one these EFS-encrypted files were backed up).
Determine the way that suits you best and follow the instructions stated below:
Back Up EFS Certificate
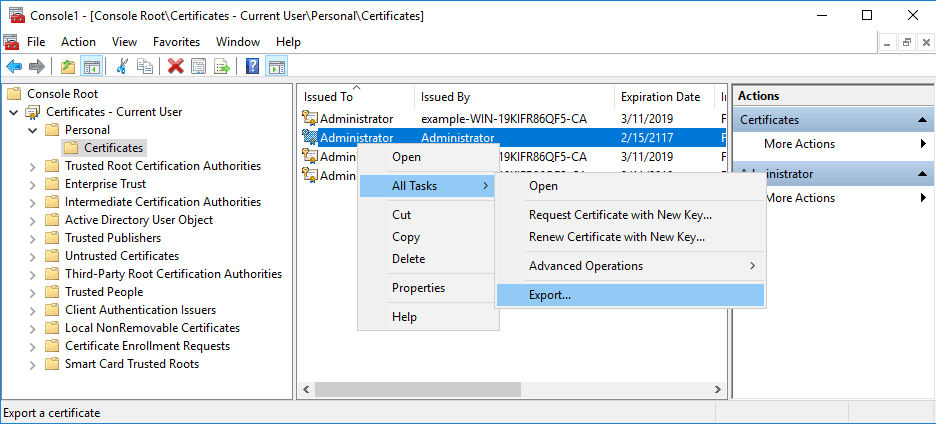
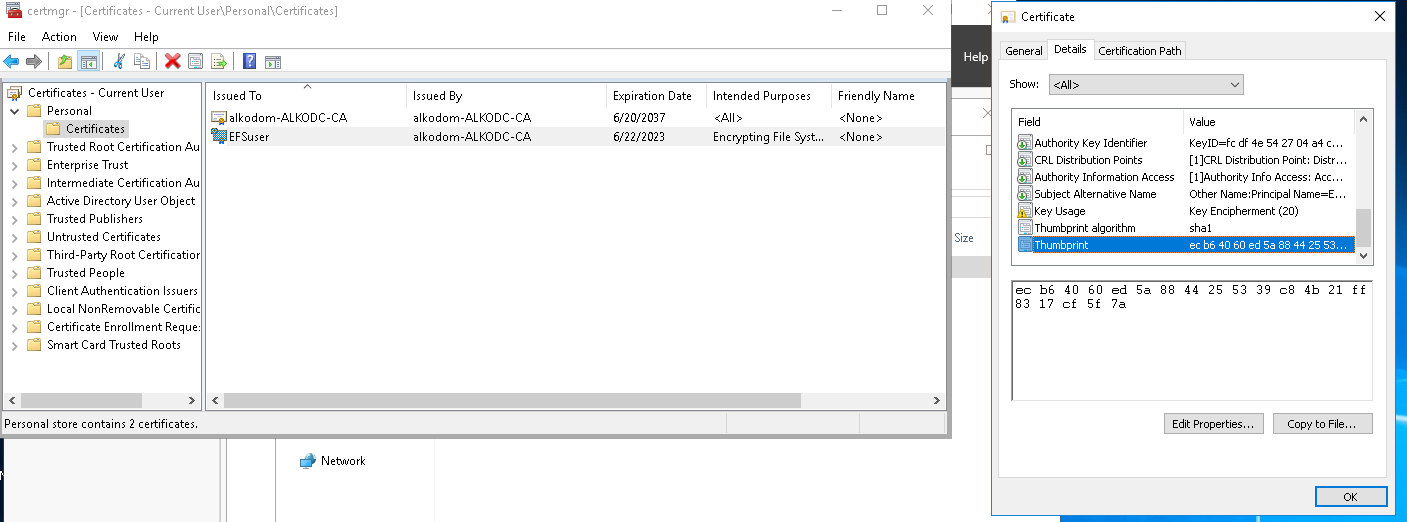
To back up an EFS certificate, open the MMC console and add the Certificates snap-in. From here it is possible to browse certificates associated with a user or computer. In this case, the personal store is browsed.
- Right-click on the certificate to back up, then select All Tasks > Export.
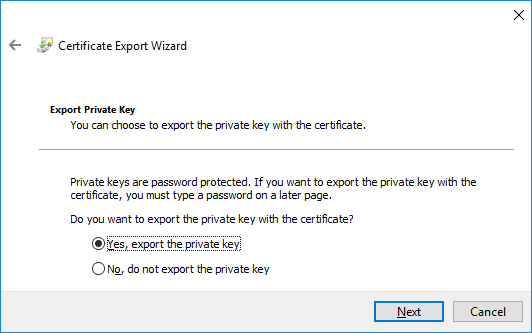
- Certificate Export Wizard appears. Click Next.
- Select Yes, export the private key option.
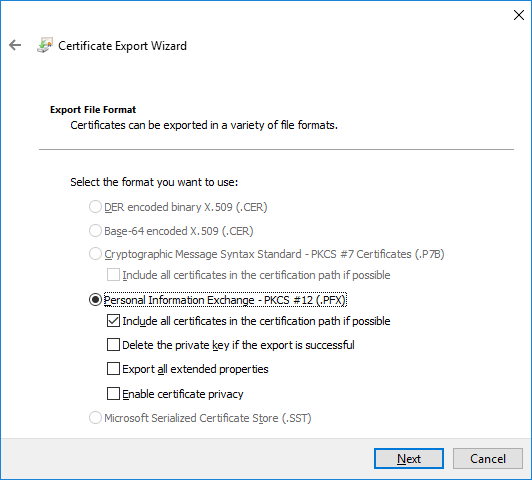
- Select the format to export in. When exporting the private key, the .PFX format is generally a standard in Windows. If the certificate would be the only thing exported, you could export it in a .CER format instead.
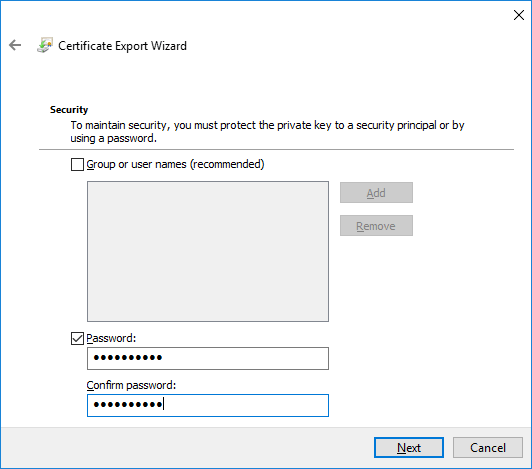
- As the private key must remain secure, create a password for the file.
- Select the location and name for the exported file.
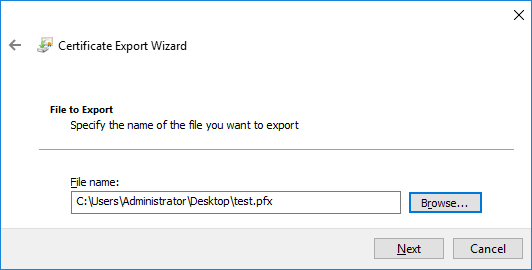
- Check your settings, then click Finish to complete the process.
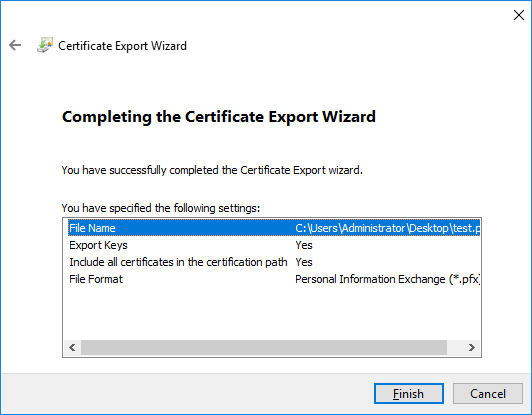
Once the procedure is completed, a pop-up notification appears. The created .pfx file contains the exported certificate and the private key in the location specified.
You can also back up a certificate with PowerShell using the Export-Certificate cmdlet
| Top |
Key Archival of EFS Recovery Certificate
Follow these steps:
- Step 1. Add Key Recovery Agent Certificate Template
- Step 2. Request Personal Administrator Certificate
- Step 3. Add a Key Recovery Agent Certificate Using Group Policy
- Step 4. Force Update Group Policies
- Step 5. Use Key Archival
Step 1. Add Key Recovery Agent Certificate Template
Add the Key Recovery Agent certificate template to the list of available certificate templates.
- Log in to the Certification Authority computer with administrative rights.
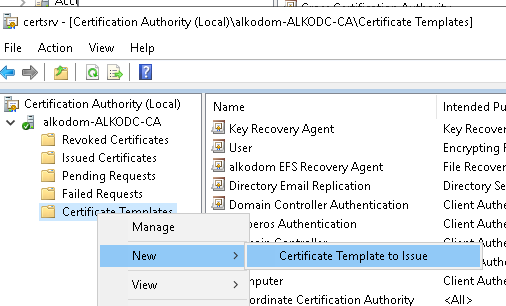
- In the Windows Administrative Tools, click Certification Authority. 3.On Certification Authority, right-click Certificate Templates and select New > Certificate Template to Issue.
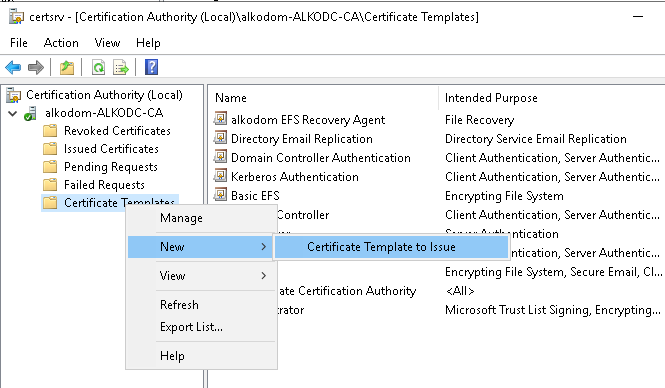
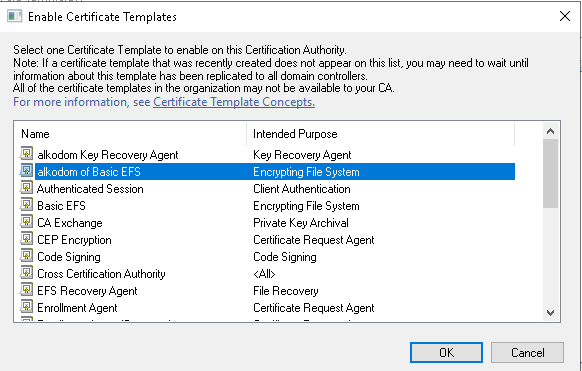
- Select the Key Recovery Agent in the list of certificate templates.
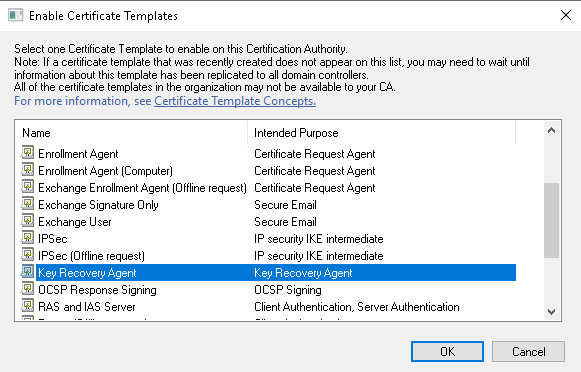
- Click OK to enable this certificate
- A Key Recovery Agent certificate template appears in the list of Certificate Templates
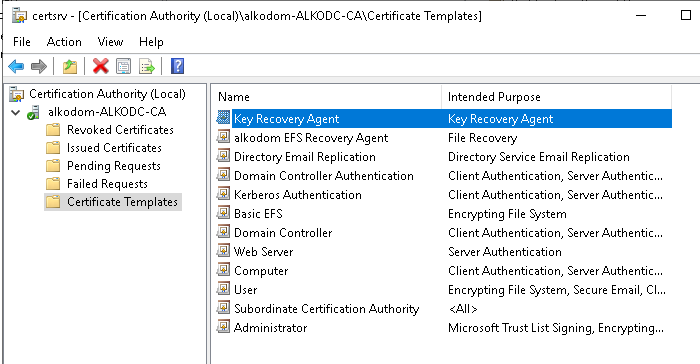
Now you are ready to request a personal administrator certificate using this Key Recovery Agent certificate template.
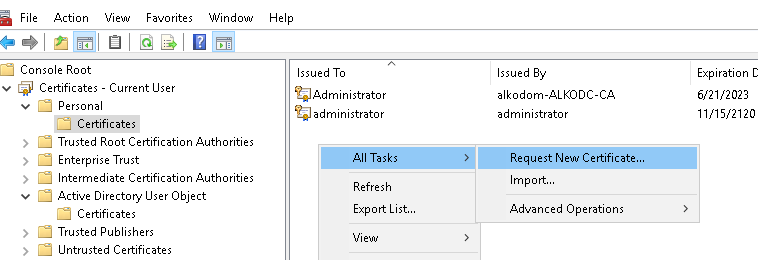
Step 2. Request Personal Administrator Certificate
To request a personal administrator certificate using the Key Recovery Agent template published above, proceed as follows:
- Open the MMC console and add or select the Certificates snap-in.
- Right-click the Certificates folder under personal store, and select All Tasks > Request New Certificate.
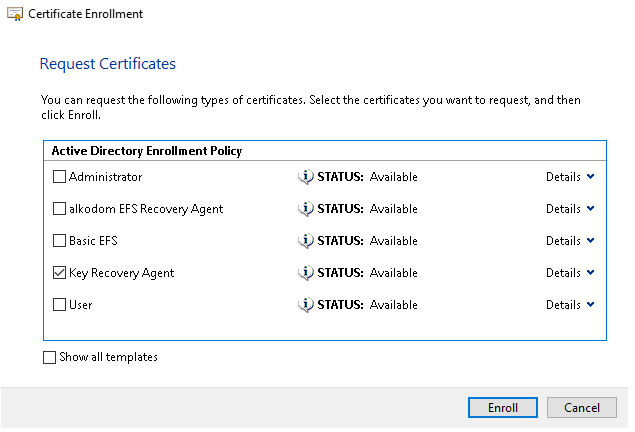
- In the Certificate Enrollment dialog, select Key Recovery Agent in the list of available certificates, then click Enroll.
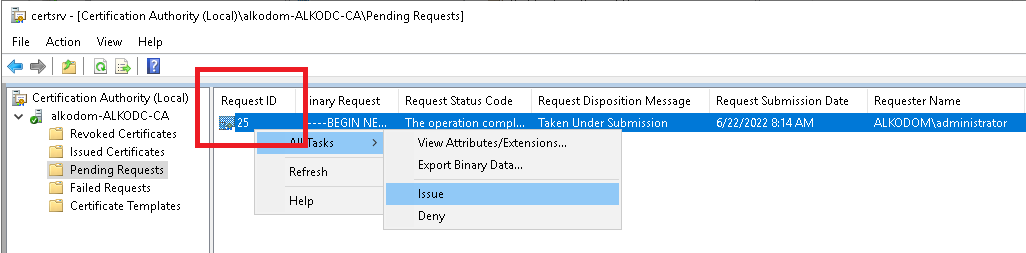
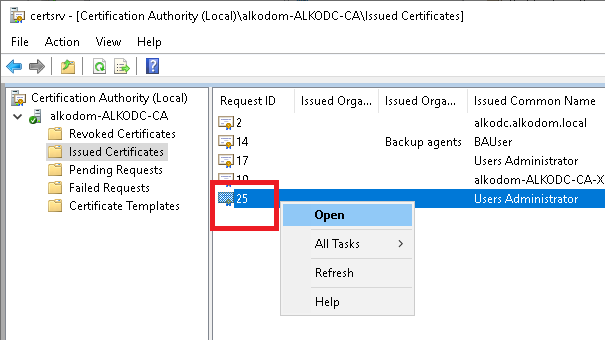
- In Certification Authority click the Pending Requests folder.
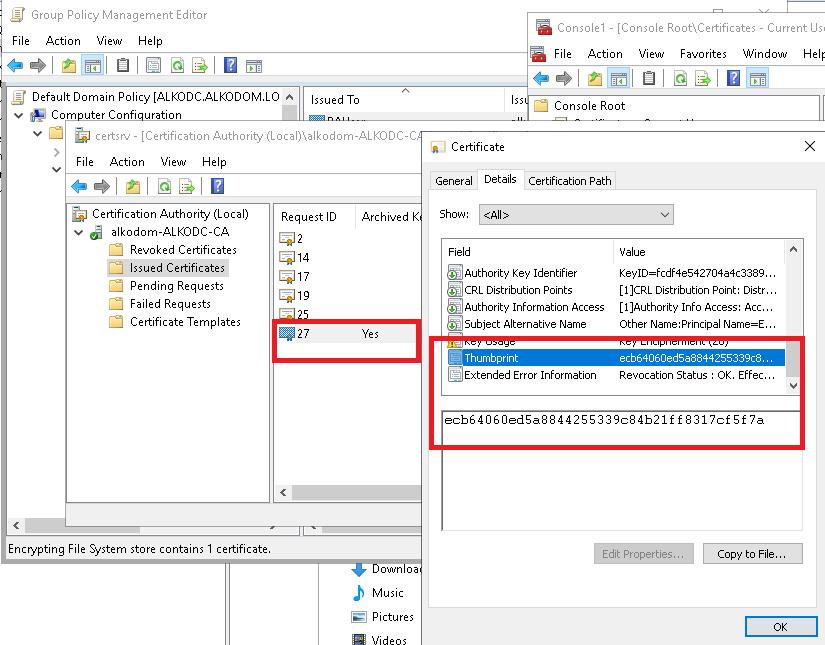
- Right-click your pending request, then select All Tasks > Issue to issue a certificate requested above. Save the Request ID copy of the certificate to file.
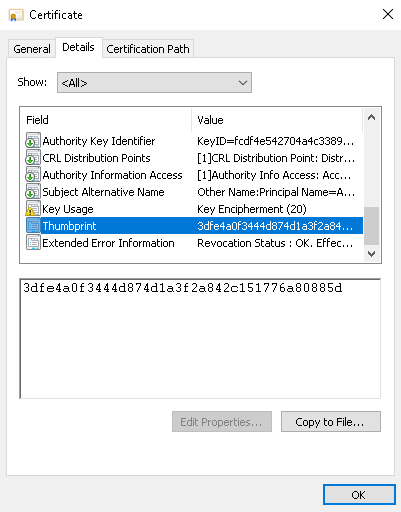
- The certificate appears in the Issued Certificates folder. Right-click the certificate and select Open.
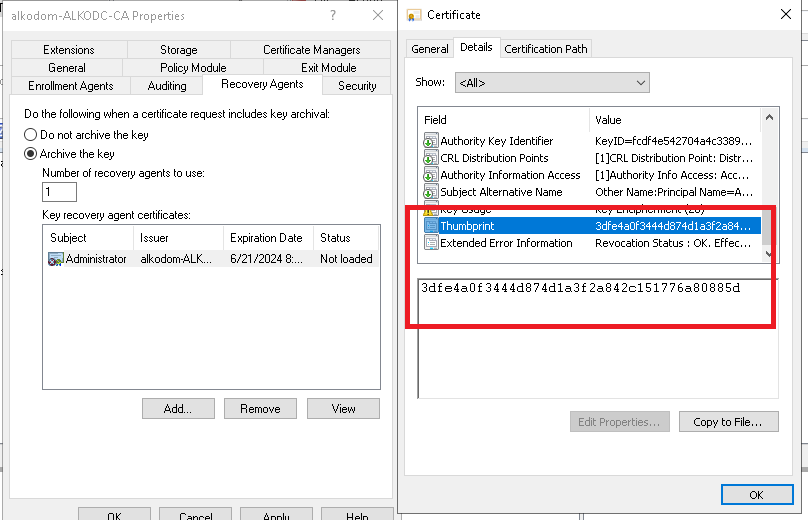
- Select Thumbprint and click Copy to file.
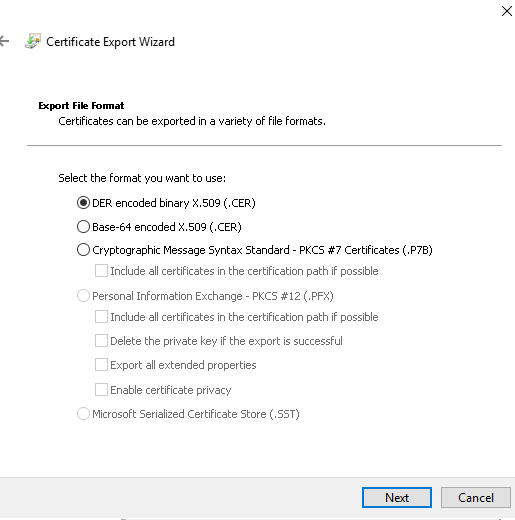
- Export certificate to file, for example, to archive-admin.cer with Certificate Export Wizard. On the Export file format step, select DER encoded binary X.509 (.CER).
- In Certification Authority snap-in, add and configure the Recovery Agent. Right-click the domain, then select Properties.

- Click Recovery Agents tab.
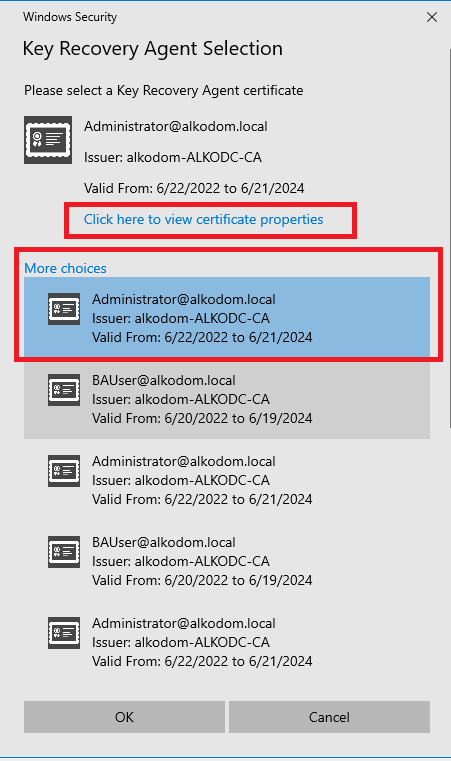
- Select the Archive the Key option. Click Add.
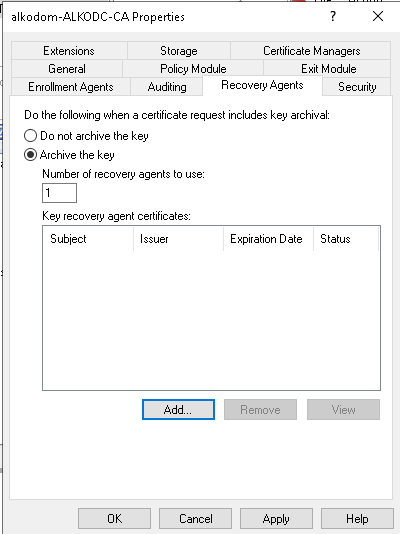
- Select the certificate you issued and verify the thumbprint of this certificate matches the thumbprint saved to the file above. Click OK.
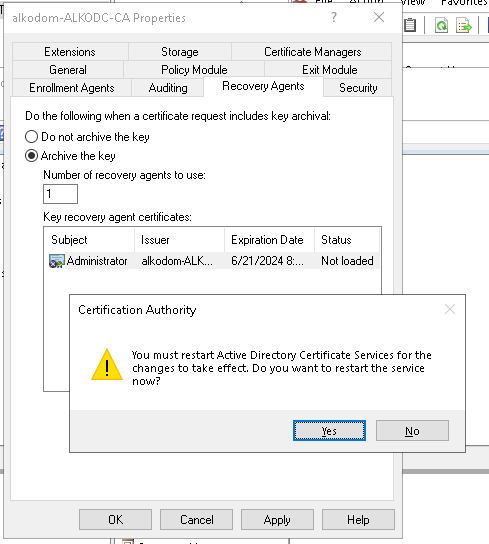
- Restart Active Directory Certificate Services for changes to take effect.
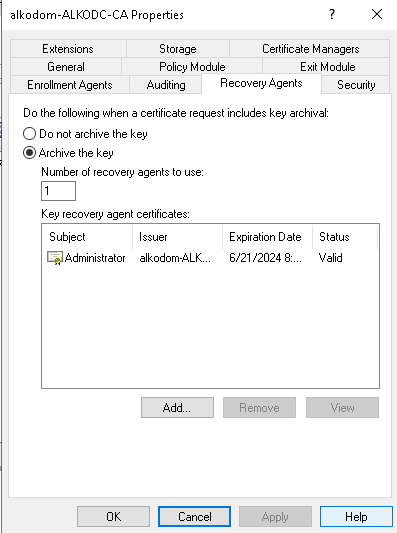
- In Properties, click Recovery Agents to check if the certificate is in a valid status. Click Cancel.
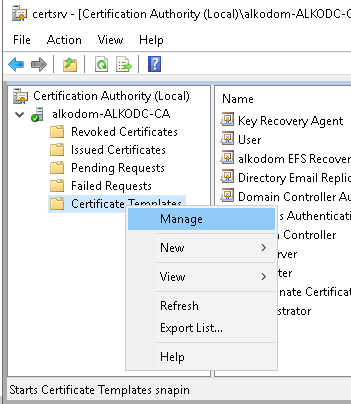
- Add a new EFS template based on the Basic EFS template. On Certification Authority right-click Certificate Templates and select Manage.
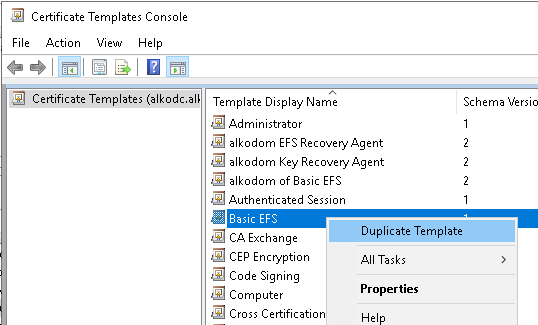
- Right-click the Basic EFS template and select Duplicate Template.
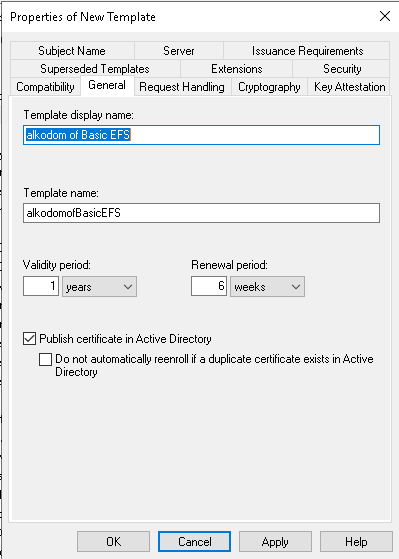
- Configure the new template properties:
- Name the template on the General tab
* On the Request Handling tab, select **Archive subjects's encryption private key**
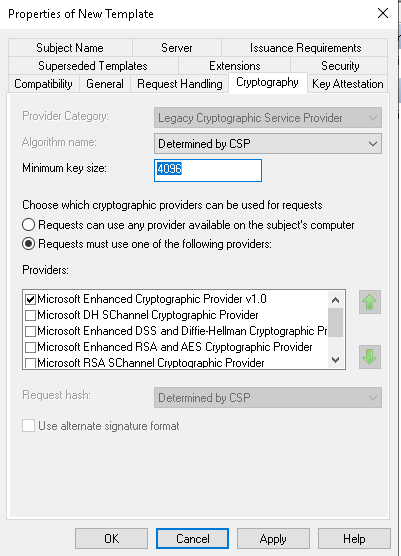
* On the Cryptography tab, set the minimum key size
* On the Security tab, grant the Read permission to the Key Recovery Agent account
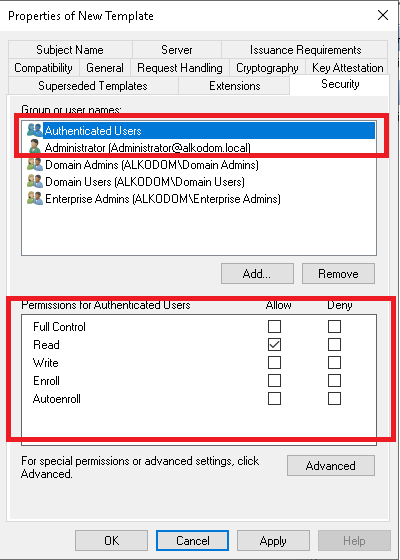
- Click Apply.
- Publish the created certificate template. On Certification Authority, right-click Certificate Templates and select New > Certificate Template to Issue.
- Select your template by name and click OK to enable it.
Now you are ready to add this Key Recovery Agent to Group Policy.
Step 3. Add a Key Recovery Agent Certificate Using Group Policy
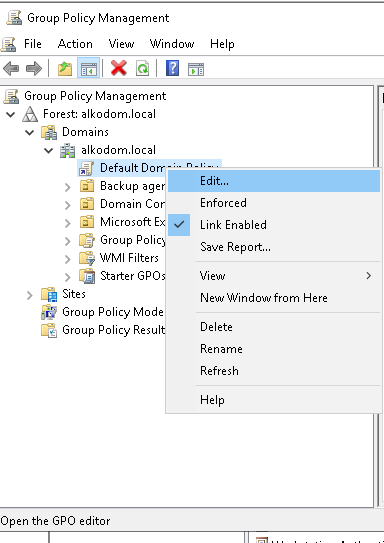
- Open Group Policy Management snap-in
- Right click Default Domain Policy and select Link Enabled
- To edit Default Domain policy, expand Computer Configuration > Policies > Windows Settings > Security Settings > Public Key Policies. Right click Encrypting File System and select Properties
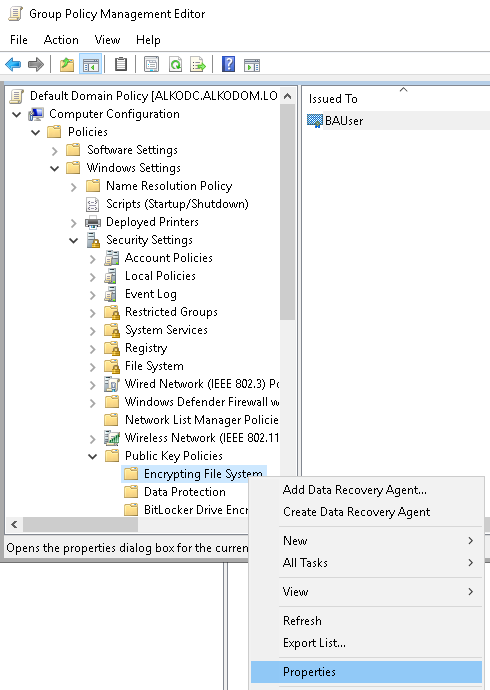
- On the General tab for File Encryption System (EFS), select Allow.
- On the Certificates tab, select your template for EFS template for automatic certificate requests and clear the Allow EFS to generate self-signed certificates when a certification authority is not available check box.
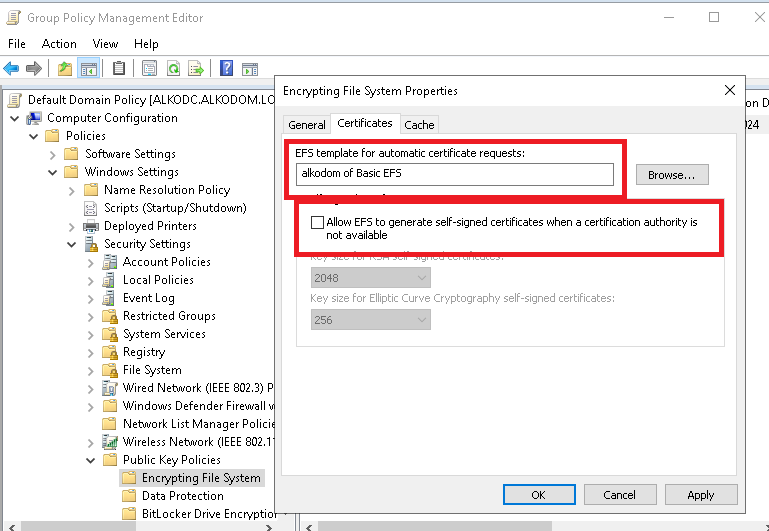
- Click Apply.
Now you are ready to update group policies on the computers where you want to back up EFS files.
Step 4. Force Update Group Policies
- Login to original client computer, do the gpupdate /force

Now the created Group policy is used on this computer. You are ready to check if key archival can work properly.
| Top |
Step 5. Use Key Archival
- Log into original computer as standard user that does not have an EFS certificate.
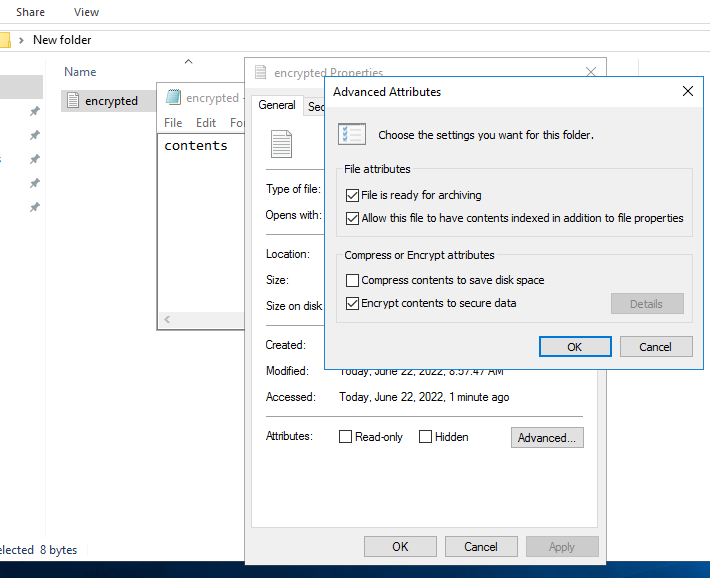
- Create and encrypt a file.
- Make sure that the new user has access to the encrypted file.
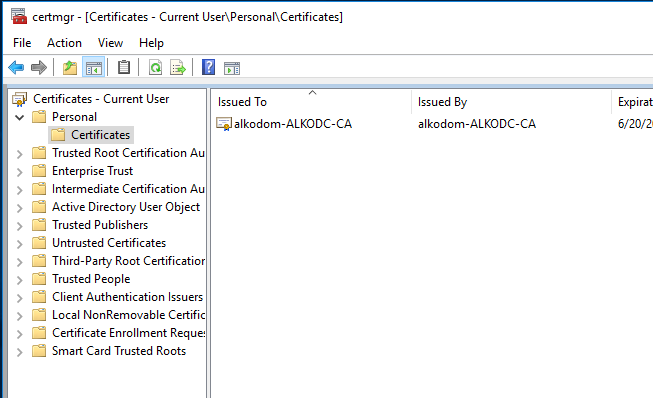
- And the same certificate appears in the user personal store.
- Log into the Certificate Authority computer.
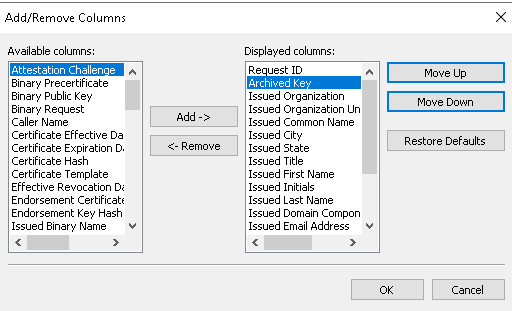
- In Certification Authority snap-in, click View > Add/Remove Columns....
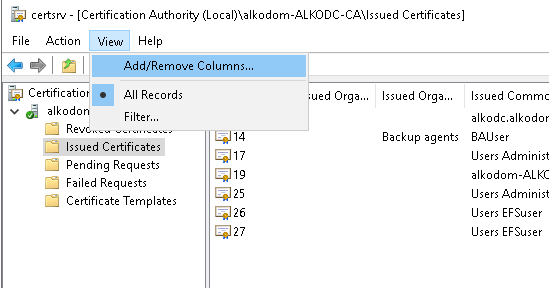
- Add the Archived Key column, and move it to the top of the list. Click OK.
- Note that a standard user certificate was automatically issued and archived.
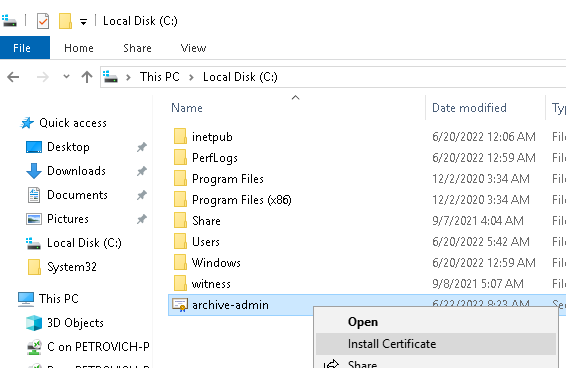
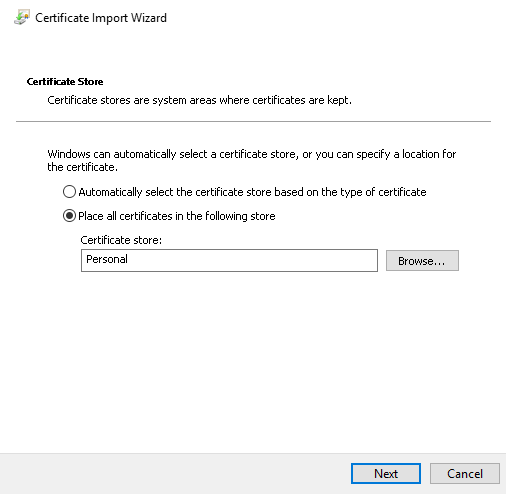
- Install previously exported Recovery Agent certificate c:\archive-admin.cer to the personal store of administrator on Certification Authority computer.
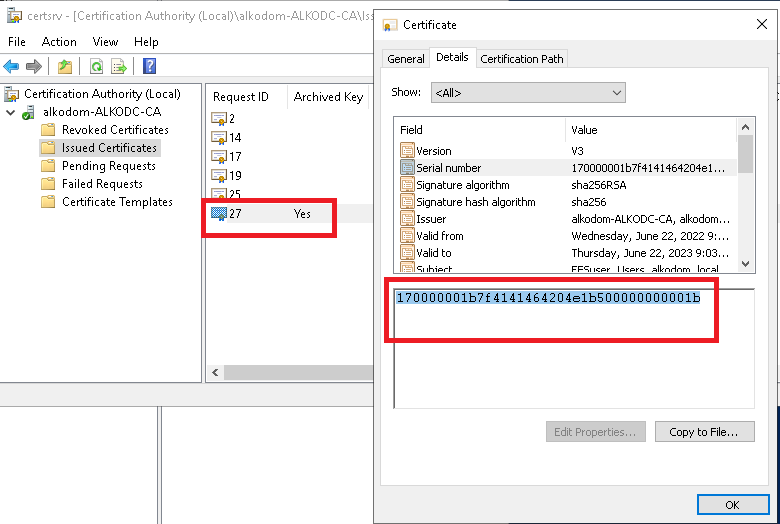
- Locate issued and archived ordinal user EFS certificate in Certification Authority and copy the serial number to the clipboard.
- Run PowerShell as Administrator.
- Execute the following commands in the PowerShell window, on the last step specify the recovered pfx password.
 cd /

mkdir keyrecoverdir

cd .\keyrecoverdir\

certutil -getkey 170000001b7f4141464204e1b500000000001b rawkeyinfo

certutil -recoverkey .\rawkeyinfo recovered.pfx
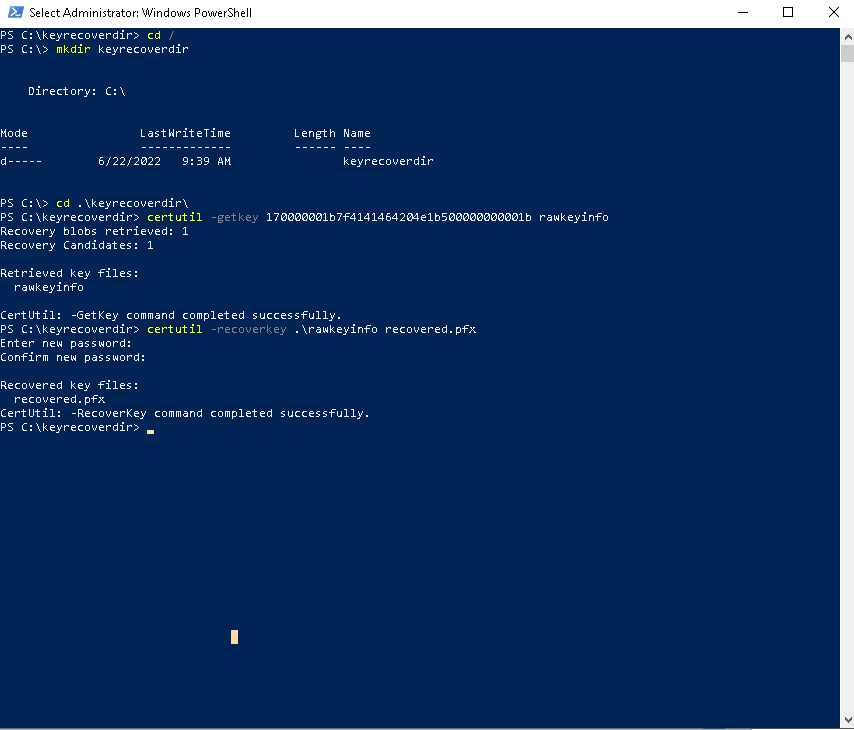
- Now the standard user .pfx certificate is recovered.

- Log into original client computer where you created the EFS- encrypted file.
- Delete the EFS keys /certificate.
- Place the recovered.pfx to file system.
- Install the recovered.pfx to the ordinal user personal certificate store.
- Log in again to the original client computer to uncache certificate thumbprint.
- Try to open your EFS-encrypted file to make sure everything is fine.
| Top |