Article ID: kb00003Last Modified: 21-Aug-2024
How to Delete Hyper-V Checkpoints
In most cases, Hyper-V checkpoints are deleted automatically in MSP360 Backup. However, in certain scenarios, a checkpoint has to be deleted manually and there are two ways to do this - via Hyper-V Manager interface or Windows PowerShell.
Delete Hyper-V checkpoint using Hyper-V Manager
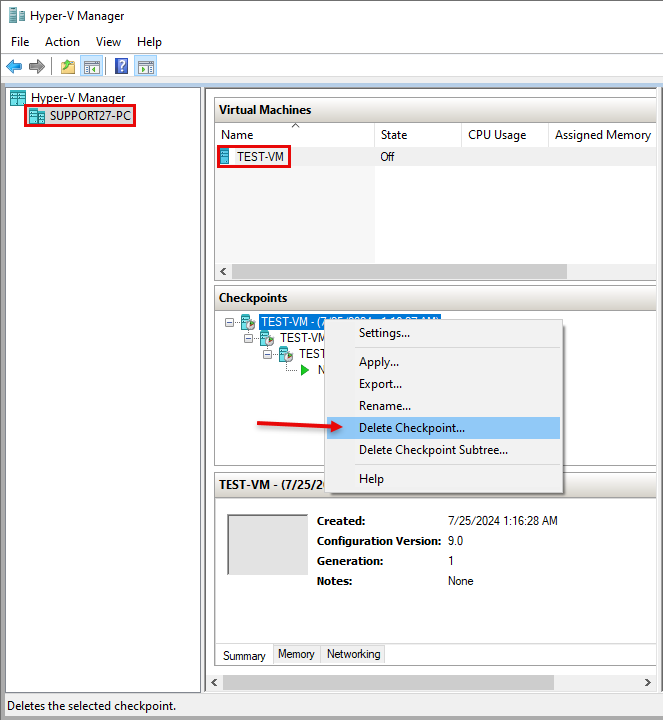
Follow the steps below to delete a Hyper-V checkpoint from the Hyper-V Manager UI:
- Select the Hyper-V host machine.
- Go to the Virtual Machines pane and select the VM in question.
- Go to the Checkpoints pane and right-click the checkpoint that has to be deleted.
- Select the Delete Checkpoint option.

Delete Snapshots using PowerShell
Make sure that Windows PowerShell is installed on the machine:
Follow the steps below to delete a Hyper-V checkpoint with PowerShell commands:
- Start Windows PowerShell as administrator
- Use the command below to get the exact name of the checkpoint (make sure to provide the correct VM name):
Get-VMSnapshot
- Execute the command below to delete the checkpoint in question:
Get-VM -Name <VMName> | Get-VMSnapShot -Name <CheckpointName> | Remove-VMSnapshot
- Verify that the checkpoint was deleted successfully deleted with the command:
Get-VMSnapshot